htmlslides - write presentations in HTML.
htmlslides is some CSS and JavaScript that allow you to write presentations in simple HTML, and have them look like a slide presentation.
You can see an example presentation here: https://andybalaam.gitlab.io/htmlslides/demo.html
(Note that mouse-clicks-to-move-slides are disabled in the demo, but you can enable it in your presentations.)
Features
- No need to pre-process the HTML before publishing
- Looks fine without JavaScript, just doesn't page up/down nicely
- Bookmarkable links to individual slides
How to use
Download htmlslides.js and htmlslides.css into your project directory, and refer to them in your HTML. Use the HTML format described below to write your slides, and they should look like a slide presentation in your browser.
HTML format
Structure your HTML like this:
<html>
<head>
    <meta charset="utf-8"/>
    <link rel="stylesheet" href="htmlslides.css">
    <script src="htmlslides.js"></script>
    <title>How to Surf the Mist</title>
</head>

<body>
    <header>
        <h1>How to Surf the Mist</h1>
        <!-- ... some stuff ... -->
    </header>
    <section id="contents">
        <h2>Contents</h2>
        <ul><li><a href="#breathin">First, breath in</a></ul>
        <!-- ... some stuff ... -->
    </section>
    <section id="breathin">
        <h2>First, breath in</h2>
        <!-- ... some stuff ... -->
    </section>
    <!-- ... more slides ... -->
</body>
</html>
Open the Developer Tools in your browser and check the Console output. If htmlslides was unable to understand your HTML, it will print error messages there.
The header and contents slides are optional.
How it works
The CSS in htmlslides.css will format your page so that each <section> (and
the initial <header>) takes up the whole screen, and the font sizes are
sensible for constructing slides. You can edit the colours at the top of
htmlslides.css to your liking, or override them in your own separate CSS file
(make sure the <link tag for your own CSS file is listed AFTER the
htmlslides.css one).
When the page loads, the JavaScript in htmlslides.js will allow you to move between slides by pressing the left/right arrow keys, or page up/down keys, or by clicking the left/right mouse buttons.
Disabling mouse click behaviour
You can disable mouse-clicking by including htmlslides.js like this:
<script src="htmlslides.js"></script>
<script>
htmlslides.config.mouse_moves_pages = false;
</script>
Exporting as a PDF
The best way I have found to make a PDF from my slides is using Firefox's Print to File functionality. Here is how I did it:
- View your slides in Firefox and open the Print dialog (press Ctrl-p).
- Select Print to File and choose a filename to save to.
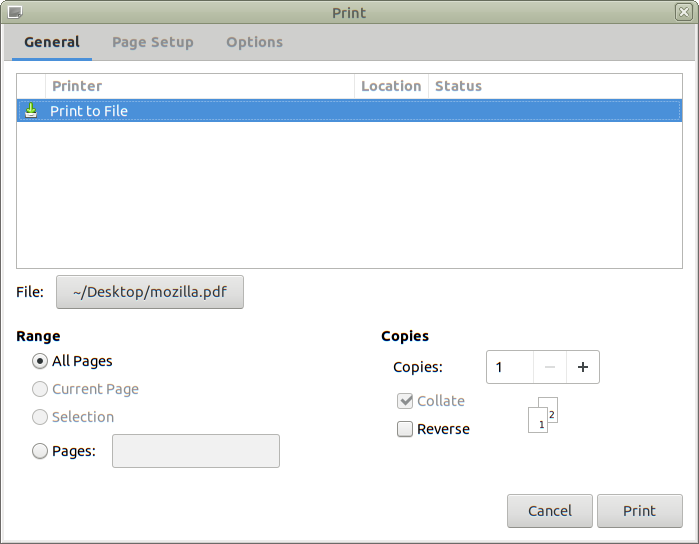
- Under Options deselect "Ignore Scaling..." and select "--blank--" for
all the headers and footers. Ensure "Print Background Colours" and "Print
Background Images" are selected.

- Under Page Setup set Scale to 70.0 and Orientation to Landscape.

- Select the dropdown next to Paper size and choose Manage Custom
Sizes...
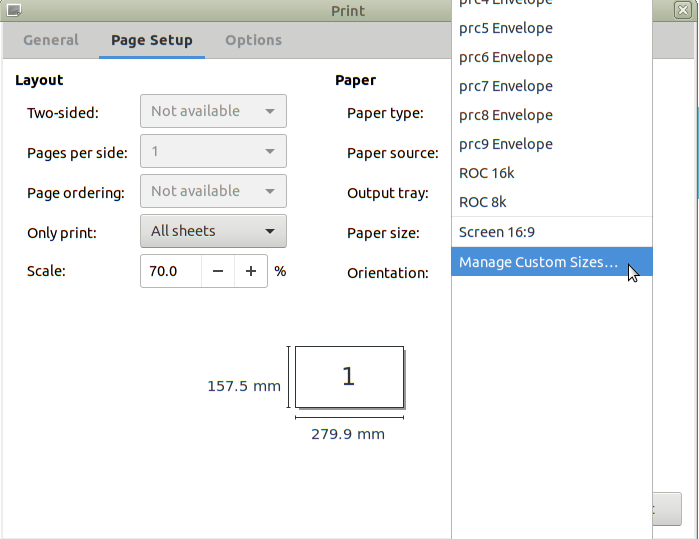
- Create a new custom size called "Screen 16:9" with Width "157.5" mm and
Height "280.0" mm. Set all the Paper Margins to "5.0" mm. You can modify
the name of the custom size by clicking on it in the list on the left.
Click Close.

- In Page Setup, make sure your new custom size is selected next to Paper Size.
- Now click Print.
If that does not work well for you, try experimenting with different Scale settings.
Licence
htmlslides is Copyright 2010-2020 by Andy Balaam and is released under the MIT Licence. See LICENSE for details.
Note: earlier versions were licensed under APGL, but I was concerned that this might force people to license their presentations under the same licence, or that they might be concerned about that, so I changed the licence to MIT. The intention is that people can write and distribute presentations that include htmlslides without being forced to use a specific licence for their presentation.